I’ve long been drooling over the glossy furniture created by Sucheta of the Resplendent Crow, Reeves at The Weathered Door, Christina from Phoenix Restoration, and others. I’ve wanted to spray pieces for nearly a year now, but heretofore was stymied by a lack of adequate space, proper equipment, and the guts to just.do.it. This post, over 3,500 words (just a warning that!) charts my first attempt at spraying, from the building the workshop, to the equipment, products, and process. I also include at the end, a list of resources and what you’re more than likely most interested in, if you’re at all interested in spraying furniture: the upshot. If you’re an upshot kinda gal or guy, like maybe you read the last page before finishing the book, feel free to skip to the end.
Confession: Prior to completing this piece, I’d never sprayed anything with a legit sprayer, since I’m pretty sure spray paint (a delightful tool!) doesn’t count. So here, you’ll get the whole truth and nothing but the truth when it comes to this girl’s first spray venture.
The space
Like many others, I’ve been limited in my furniture restorations by my utter lack of space. Read: no garage, no basement, no outbuildings of any sort, beyond a small garden shed stuffed to its gills with everything that belongs in a basement and a garage. So yeah, no room in there. This means, as you might guess that my work has been limited to either the great outdoors or my cozy (again, read between the lines here) living room. While I tend to be impatient, I’ve managed to maintain my sanity for the last three years, but the scale has grown, the projects are more complicated in their restorations, I wanted to spray pieces (this was NOT going to happen in the living room), and the kids wanted to play in the space, for heaven’s sakes. In short: I needed a workshop.
Enter the porch, aka, my workshop. We plan to build a garage eventually, though we’re likely on the 5-7 year plan. In the interim, we built a deck in the fall of 2014, poured concrete forms to support the deck and its future structure, and constructed the porch this last fall. Our winters can be a COLD, so insulating the space was a must. Farm Boy finished insulating the walls and floor in December, and constructed a spray booth in January post holiday chaos. I’ll write a post on how this happened, but for now, will dish on my first spray venture.
This “workshop” will eventually become a real, charming porch, complete with authentic barn board walls and built-ins, but as I mentioned before, we’re most definitely on the 5-7 year plan.
The equipment
If you’re not familiar with Sucheta’s blog and you adore glossy furniture, you should definitely check it out! She wrote a series of posts on her prepping process, her gun set-up, etc., and Sucheta’s content certainly informed my equipment decisions though I ended up going a different route.
What I’ve learned in my extensive research is that you can essentially spray pieces using one of two options. As is true with most things, each set-up has its pros and cons. The first system, the one that Sucheta uses, is a compressor-based system with a gun attachment; as I understand it, Reeves and Christina use the same type of set-up. This system requires a powerful compressor, fittings, quality hoses, and a quality gun.
COMPRESSOR SYSTEM
Pros
Powerful and versatile (you can spray a wide variety of materials: enamels, latex and oil paint, lacquers, etc., given the compressor’s power)
You’re not limited to one system or gun type
If you already own a powerful compressor, it’s the cheaper option
Cons
Compressors are loud (DO YOU HAVE A COMPRESSOR? EVEN JUST A SMALL ONE?? THEN, YOU KNOW THAT THEY’RE LOUD!)
Compressors, powerful ones, take up a fair amount of space
Require additional fittings to prevent water droplets from ruining a finish
More adjustments (this can also be a pro, if you’re awesome at adjustments!) means more room for user error. This, this I don’t need. I make enough errors on my own and less room for them is a good thing.
TURBINE SYSTEM
Cons
Cost—a good turbine system is spendy!
The hose can be bulky and heavy—I strongly recommend getting a whip hose to eliminate some of the bulk and weight
Pros
Easier to get the hang of spraying a finish
Small and portable
Sold as a complete package: gun, turbine, and hose
The two things that made me choose a Turbine system: the smaller learning curve, and the fact that it’s small and self-contained. That, and I didn’t have a good, big compressor so I would have needed to invest in one (expensive) and I don’t have a lot of space, even with the workshop. I also chose a five turbine system (more POWER!) reasoning that this extra power will allow me to spray a wider variety of finishes: lacquer (thin), latex and oil paint (thick) being the major products I’d like to spray.
The Piece
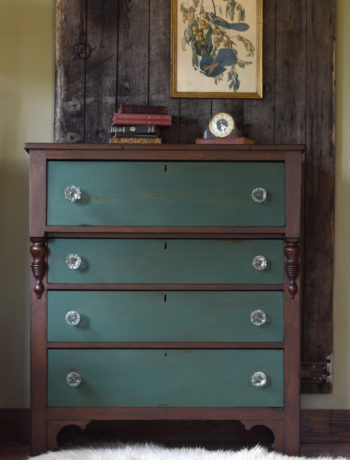
Though I’m a poor candidate to offer advice, given that I’ve sprayed just ONE piece in my entire lifetime with this system, I think I can still safely say that it’s better/best to spray something that you really don’t care about. As in, if you completely screw it up, you won’t do something stupid. I had the perfect piece to spray: A mid-century Kroehler dresser with a laminate top and sides, but with some real, interesting wood accents, and solid wood drawers with dovetailed joints. It’s a quality piece, but needed some cosmetic help, and I felt zero guilt about covering up laminate. Did I mention I paid $25 for it?
The Products
In my eagerness to start spraying stuff, I had purchased a gallon of Benjamin Moore’s Advance paint in Semi-gloss in “Nimbus Gray” and planned to spray the piece in that particular product. Of course, I purchased this whole gallon of paint after I read about Christina and Ben’s break-up, but dang it, I’m going to use it. All. Of. It. You’ll be seeing this color on the blog, again. And again. And probably again.
I also purchased a gallon of General Finishes Enduro Lacquer in Gloss. This time, though, I purchased a gallon because it was the only size available. Me = Fast Learner. I had originally purchased the product for a different project (Kent!), but I keep finding these utterly gorgeous painted, lacquered pieces via the interweb. Since the BM paint is semi-gloss and it’s the gloss that makes me drool, lacquer over the paint seemed a natural choice. One thing to keep in mind, if I’m inspiring you to try your hand at something similar is to make sure that your lacquer is not solvent-based (traditional lacquers are) as the solvents in the lacquer will likely ruin the paint. Crinkly paint and curse-worthy situations might ensue. GF Enduro Lacquer is, however, water-borne and as such compatible with the water-based alkyd that is BM Advance. Whew.
Prepping the Piece
Here, I largely followed Sucheta’s directives. Careful sanding of the laminate, tacking it before priming. Then priming with an oil-based spray primer. Then, sanding again. Then filling any dings, dents, etc., with Bondo glazing putty. Then sanding the glazing putty, tacking again, priming again, and then sanding and tacking again. And then, I was FINALLY ready to paint. Note, however, that I taped all the drawers off with Frog tape and craft paper to eliminate any overspray in areas where it mattered.
Prepping to Spray Benjamin Moore Advance in Semi-Gloss
I’ll be honest here. I was a hot mess when I started prepping for this stage—certain that I was going to somehow ruin the dresser (did I mention the importance of starting with something you don’t care about?!), or worse, ruin my expensive spray system. Thankfully, Farm Boy was around to calm my fears and general spastic-ness.
Before you do anything, go purchase Spray Finishing Made Simple (an affiliate link) by Jeff Jewitt, who’s given god-like status in the woodworking forums on the web for his well-deserved reputation as an expert in finishing. Then, read it cover to cover. Then, watch the included DVD. It covers so much and is explained in such a way that it’s easy to understand and relatively easy to execute with some, even limited practice.
Practice sounds maybe a bit silly, and you might be wondering how you do you practice spraying paint? Water, my friends, water. Jewitt recommends getting familiar with your gun, its various adjustments like fan size (how much area a pass across the dresser will cover), fluid delivery, air controls, etc. before you put any paint in it. So, the first thing I did was fill my HVLP gun with H20 and spray it at some cardboard. A bit messy yes, but spraying the water allowed me to mess with the fan size, fluid delivery, etc. to get a sense for the gun’s adjustments. To be honest, I’m still figuring it out and each spray session enables me to fine tune both my understanding of how the gun functions and my ability to make the necessary adjustments for an optimum finish.
Once I was semi-comfortable with the gun itself—setting up the turbine and hose was as simple as could be and not worth going into here—I mustered up the courage to begin spraying real paint. O.M.Goodness. However, before I could spray anything successfully, I needed to 1) select the right needle and 2) Thin the paint.
Needle and cap selection:
In order to get a beautiful finish, you need to use the correct needle size for the material you’re spraying. Thinner materials, like lacquer, stain, etc., require smaller needles, whereas thicker materials like latex, enamel, varnish, etc. require a larger needle. Makes sense, right? In case you’re wondering, I used a blue cap and needle size 1.3mm (Fuji system), though I’m thinking that in the future that with the BM paint, even thinned, that I’ll go up a size for a better atomization.
Thinning the paint, or a brief lesson on viscosity:
I know a term like “viscosity” can seem a bit scary, like one more reason to not spray anything, but the term simply refers to a material’s thickness; in this case, BM Advance in semi-gloss. For a product to atomize properly, it needs to be thin enough to do so, but not so thin that it runs or becomes gritty when applied. Apparently latex paints were not intended to be sprayed and are thicker so when people roll or brush them out of the can, there’s not a whole lot of splish-splashing happening. Straight of the can though, they’re too thick to spray. What’s a girl to do? Thin the product, but not too much. According to everything I’ve read, 10% for latex is a good rule of thumb. Since I’m not a huge math fan (I make Farm Boy do that too!), I relied on this recipe, courtesy of Jeff Jewitt for latex paint. (Get the book, I’m telling ya!)
3 oz. distilled H20
3 oz. Floetrol
26 oz. paint
Mix everything together in a graduated quart paint container, starting with the water, then add the Floetrol and stir about 10 seconds. Then, add 26 oz. of paint so that the total liquid equals 32 oz. Stir for about a minute. NOTE: This recipe made far more paint than my project required, so consider adjusting the recipe as needed based on how much paint you anticipate using for the project.
Strain the paint, using a fine filter, into the gun. Doing so helps eliminate impurities from the paint so they don’t end up in your finish.
Spraying the Dresser with Benjamin Moore Advance in Semi-Gloss
Still with me? Waiting with bated breath to see how the story ends? Good. Thanks for hanging in. So a quick recap, or what I’ve done up to this point.
1) Built a workshop, though to be fair, that was mostly Farm Boy 2) Purchased a Fuji MiniMite 5 3) Picked a piece I didn’t care if I ruined 4) Practiced using my fancy new gun and turbine system 5) Selected the proper needle size for my material 6) Thinned and then strained the paint into my fancy new gun.
So that leaves me quaking in my boots, totally unsure if this going to work as I hope it’s going to. I’m not usually melodramatic, but this post seems to suggest otherwise, doesn’t it?!
Jewitt strongly suggests shooting paint at cardboard or some other unimportant object to see what adjustments you might need to make as it relates to fan size, paint atomization, etc. This is what I did, and I think it’s incredibly important to do this in the beginning, but also throughout the spraying to make sure that things are still working as they should. (Disclaimer: this is newbie advice!) My first coat went on okay. I hadn’t quite figured out how, exactly, to make the fan size larger, and so the first time around things were a bit splotchy because it was difficult to evenly overlap the small fan pattern. After letting the paint cure for about 24 hours, I sanded with 320 paper and sprayed a second coat. This time, though I adjusted the fan size, there was too much paint and so the first side was a little too thick, though I quickly adjusted the gun for better application. Each time I learned something. I wasn’t as FREAKED that I might break the spray system. I became more comfortable with the equipment and more familiar with gun’s adjustments and more adept at making the necessary changes.
Here’s the order I sprayed things, loosely based on Jewitt’s process: one side, then front of the frame (making the fan size smaller so as to avoid overspray and paint waste), then the other side, and then the top LAST. In terms of application, it’s important to overlap each pass by half, so hence the need for a large enough fan pattern, and to begin spraying the paint (ie, pulling the trigger!) before you actually start putting the paint on the piece and releasing the trigger after you’ve reached the other side. Doing so helps eliminate awkward blobs of paint at the starting and ending points.
Even with the minor missteps, I’m happy with the finish. It’s not perfect, of course, but the paint leveled beautifully, even in those places where it got a touch thick. I guess I can attribute that to good paint and Floetrol. Time for the lacquer.
Spraying General Finishes Enduro Lacquer in Gloss
Here, it was hurry up and wait. I needed to wait at least 48 hours between the paint and the lacquer coats. Given my work schedule, I sprayed the last paint coat on a Wednesday and then opted to spray the lacquer that Saturday, though this process happened over the course of several days.
As always, a certain degree of trepidation permeated my preparations. I decided to spray using the same needle using the GF Lacquer product specs as a guideline, knowing that if I applied the finish and wasn’t happy with the results, I could easily use the smaller needle and cap set I’d purchased separately. When spraying, you’ll hear all these terms bandied about: viscosity, wet coats, mil gauges, needles, caps, atomization and others. It can be really overwhelming and the stakes are high: no girl in her right mind wants to do the unrewarding prep work, again.
Initially, I opted to not thin the product, given that it’s designed for spray applications only, though this particular lacquer can be thinned with water. To avoid a redo, I attempted to measure the wetness of the lacquer using a mil gauge the for first lacquer spray session. Essentially, I shot some lacquer at some cardboard and then dragged the gauge through the wet material; the first no trough area equals the the mil. For the product I was using, General Finishes recommended a mil between 2-5. I could sorta get a 5, though I suspected the material might be slightly thick, though not so thick that I thought I absolutely needed to thin it. Once I’d checked the gauge, I adjusted the gun for fan size and fluid delivery, and when I was happy with the atomization, I sprayed only the drawers. Can you guess why? I’m sure you can. If it didn’t go as planned, I didn’t want to redo the entire dresser.
I shot the first coat and it was acceptable (me and my exacting standards!), but I decided it could be improved upon; as I’d suspected, the finish was a touch thick (though things might be different on a hot day!) and I opted to thin it with distilled water. I started with 10% thinning, but found that optimum thinning was about 5%. In the future, I think I’ll use GF Enduro Extender (it functions in the same way as Floetrol) rather than water to improve self-leveling. Again, it was a lot of trial and error, reading along the way, and finding woodworking forums that spoke to the problems I was facing.
However, here’s the great thing about lacquer. Under optimum conditions, it dries really, really, really fast. Translation: You can spray the recommended three coats in one day. However, given the colder weather, my inexperience, and the necessary trouble shooting I sprayed over the course of two days. Between subsequent coats, I scuff sanded with a 400 grit sandpaper to ensure a smooth surface and good adhesion, tacked, and sprayed the second and third coat. Oh my. This was well worth the wait, as I sincerely hope you’ll agree.


The Upshot
“In conclusion….” just kidding. Never start your recap with “in conclusion,” right?!
So, what are my thoughts on this fancy system I purchased and the spraying possibilities? Honestly, I’m in love. The system is easy to use and and to understand its basic operations, which for someone like me who’s afraid she’ll break the equipment just by looking at it wrong, is a must. The gun, a Fuji 7500 is easy to operate, though a touch heavy when filled with paint and easy to clean. The turbine is tiny (you could easily store it in a closet if you wanted or had to!), but powerful, and crazily enough, isn’t much louder than a vacuum cleaner when it’s running.
Obviously, there’s still so much more to learn: I want to get better at adjusting the gun for paint and lacquer applications, so now need to find some affordable but quality pieces that I don’t mind sacrificing on the altar of my spraying education. But for today, I’m happy.
Some general observations from this girl, or things l learned along the way
Give the finish time to do it’s thing. At times, I’d put on a coat (either paint or lacquer) and be initially frustrated with the finish, not realizing that the finish would level itself out.
Time is your friend, both in cure time and in time between coats. Try to be patient!
Try to accept that it’s not going to be perfect, probably ever. Know when “done is better than perfect,” though I’ll readily admit that it’s often hard to know where that line is. I like perfect!
And finally, you can definitely do it. If I can, you can.
Resources list
If you’re interested in learning more, here’s the list of resources I consulted while researching spray systems, spray booths, and spray techniques.
Spray Systems
HVLP Spray Systems // Wood Magazine
Which HVLP Spray System is Right for You? // Canadian Woodworking
High Quality Finishing with HVLP // Canadian Woodworking
Spray Booths
Portable Spray Booth // Canadian Woodworking
Lightweight Fabric Spray Booth // Canadian Woodworking
DIY Garage Paint Booth // Hearts and Sharts
DIY Spray Booth for Small Paint Workshop // Phoenix Restoration / Furniture by Christina
Spray Techniques
Basics of Spraying // Canadian Woodworking
Spray Finishing – Tips for getting Started // Canadian Woodworking
Spray Finishing and Other Techniques // A link to a 161 page PDF woodworking book published in 2006 by Taunton Press
The Wood Whisperer // Spraying Techniques // YouTube Video
Spray Finishing Made Simple // The book I found invaluable in my first spray venture
What’s next?
While this piece is well on it’s way to being done, and I’ve staged it just because, I’m planning on rubbing out the finish to make it as perfect as possible, so, you’ll being seeing this piece again and if you’re interested, can get the skinny on rubbing out a finish. At least as it pertains to this one.
If you’re interested in spraying furniture or if you already spray pieces extensively, I’d love to hear what scares you the most OR your process. Your tips/tricks etc. would be most welcome.
And because I totally DIYed it like a boss…
I’m sharing this very lengthy post as the DIY Like a Boss party, hosted by these fine folks.
Pretty Handy Girl
The Heathered Nest
Designer Trapped in a Lawyer’s Body
Until next time, fellow furniture lovers!

10 Comments
Sucheta
February 15, 2016 at 10:29 AMIt looks fabulous Rachel! I wouldn’t have guessed that this is your first spray job with a brand new system. Nice!!
Questions – You used lacquer on top of BM paint? What needle size did you use?
Even though I have a fairly powerful compressor I am thinking about getting a turbine. Apollo was a fail. I have only heard good things about Fuji.
queen patina
February 15, 2016 at 6:14 PMOh, thank you SO much Sucheta! It was stressful, but I’m beyond pleased with the end result.
As to your questions: Fuji’s systems needle and cap system is a bit different than other systems, but for both the paint and the lacquer (both waterbased/waterborne) I used the blue cap and corresponding needle (1.3mm) with is the standard needle sold with their systems. Honestly, I LOVE the system for it’s simplicity and general straightforwardness. And for me, where space is so limited, even with a “workshop” the small turbine is amazing. I ended up purchasing the Mini Mite 5 (5 turbines and so more power!) from Phelps Refinishing (http://www.phelpsrefinishing.com/MM5.html). Roger was really nice, helpful, and professional and when I bought the system it included the whip hose (a must!) and cleaning kit, and a few other extras.
Maxine White
March 6, 2016 at 8:33 PMWhat an inspiration you are Rachel!!
I too am very nervous to use a sprayer. You have certainly inspired me to try…. we have a compresser so I may choose to get a gun and give it a go.
thanks for sharing!
Maxine
queen patina
March 7, 2016 at 7:45 AMOf course! I figured I wasn’t the only girl out there who wanted to try her hand at more technical applications and decided to share my experiences. I’m far from an expert (ha!), but am determined to master/improved my skills. Thanks for the comment! 🙂
Terry
March 11, 2016 at 7:35 PMYou did an amazing job! Both on the painting of this sweet piece and on the tutorial! You really put a lot of time and effort into this post! Well done! I love the color you chose for this piece and you styled it for photos so well! If you are at all interested in joining in one more weekly party, I host Making Broken Beautiful over at the Curator’s Collection. It runs every Thursday thru Sunday and is a furniture and home decor party. I would be happy to host your talents! You do lovely work! I hope you have a great weekend!
Smiles!
Terry
http://thecuratorscollection.wordpress.com
Making Broken Beautiful
Queen Patina
March 14, 2016 at 1:02 PMThanks, Terry. I appreciate the invitation and will be sure to link up–if not this week, then next. Thanks so much! 🙂
Crystal
June 8, 2016 at 6:08 PMGirl, I am trying to subscribe to your webpage so I can get updates when you post awesomeness like this post, but it won’t let me! Also, how was your experience spray endure lacquer…is it a WB finish? I love your site! Add me to your mailing list or send me a link where I can sign up in case I’m missing it!
Queen Patina
June 29, 2016 at 2:38 PMOh jeesh. I’m a silly! Sent you an email.
I do like the GF Lacquer in gloss, but it’s still tricky to get is just right over paint–though this, I’m not ashamed to say, could definitely be attributed to user error. Surprisingly, I’ve had better application success over stained wood.
I’m currently waiting for a piece to cure (GF lacquer over GF Milk paint) and then plan to rub it out. We’ll see how it goes…the stakes are always so high! My plan is to post the story on the blog in about a week or so. 🙂 Thanks for the comment!
Suzanne Wright
October 20, 2016 at 10:20 PMI so enjoyed reading this post, you may have actually motivated me to do something creative, attack the rolls of fabric in my closet, finish hanging those pictures, call a contractor to redo our bathroom, break out of my mental paralysis and move along.
Thanks, now next you should write a novel, you are quite talented and I should know since reading is what I do best.
Queen Patina
October 31, 2016 at 8:11 AMWow! Thanks for the kind words, Suzanne. I’ve never seriously considered a novel, but hmmmm. 🙂